Here in 2024 it seems nearly impossible to set up a first generation Echo Dot – but it’s not impossible! However it’s very true that there is little, if any, Amazon support for the 1st-gen Echo Dot. So here’s how to set up your 1st-gen Echo Dot, including how to deal with that pesky ‘Local network permission required’ message. Note that you will need to have the Alexa app installed on your phone. Also note that these instructions are for the iOS version of the Alexa app, however if you are using the Android app you should be able to figure it out from these instructions. But first things first!
How to Tell What Generation Echo Dot You Have
The original Echo Dot was introduced in 2016, followed quickly by the 2nd-gen dot. Since then Amazon has released new versions of the Echo Dot roughly every two years.
The easiest way to tell whether your Echo Dot is 1st-generation or 2nd generation is by looking at the top of it. If it has only two buttons, it is a first generation Dot.
Original, First-Generation Echo Dot (a/k/a 1st-gen Dot)

Note that the hole in the top is not the reset hole, it’s the speaker. The reset hole is on the bottom of the Dot.
The Internet Patrol is completely free, and reader-supported. Your tips via CashApp, Venmo, or Paypal are appreciated! Receipts will come from ISIPP.
CashApp us

Venmo us

Paypal us

On the other hand, the 2nd-generation Echo Dot has four buttons on top.
Second Generation Echo Dot (a/k/a/ 2nd-gen Dot)

And all of the 3rd-gen and on Echo Dots have fabric of some sort on their body. Only the 1st-gen and 2nd-gen Dots are fully hard-bodies.
Ok, here we go!
How to Set Up and Connect Your 1st Generation Echo Dot
Note: Do not put your Dot into set-up mode yet. The easiest way to cause your Dot to go into set-up mode is to plug it in, so keep it unplugged for now.
Deregister Your Echo Dot
The first thing to do is to deregister your Echo Dot, as you want to set it up anew. It may not even be registered, but check to be sure, and if it is, deregister it. To deregister your Dot, go here (you need to be logged in to Amazon).
Turn Off Bluetooth on Your Phone
The Alexa app uses Bluetooth to discover nearby devices, however it won’t discover your 1st-gen Echo Dot for some reason, so it will just spin and spin. So, yes, turn off Bluetooth before going any further.
Open the Alexa App on Your Smartphone
As we mentioned at the outset, you need to have the Alexa app installed on your smartphone. You cannot do this without the Alexa app.
Open the Alexa app and from the Alexa app’s home screen, and go to the bottom and click on ‘Devices’.

At the top of the Devices screen, click on the + sign.

At the bottom of the next screen click on Add Device.

Select ‘Amazon Echo’.

Select ‘Echo Smart Speakers’.

When prompted to turn on Bluetooth, skip. When asked “Are you sure”, confirm.

It is now that you will see the notorious ‘Local Network permission required’ screen. Do not go to settings – just hit ‘Continue’.

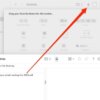
This brings you to this all-important screen – click on the link that says “Enter Manual Setup for 1st generation Echo devices”.

NOW PLUG IN YOUR 1ST-GEN ECHO DOT
After having clicked the link to “enter manual setup”, you will see this screen:

Click on the link that says “Try turning on local network,” and this will open the Alexa app’s settings in your phone’s settings section, where the Local Network setting will have magically appeared!

Go back to the Alexa app and you will be greeted with this message:

Click on ‘Allow’.
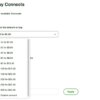
This will either take you directly to your wifi settings, or will give you a message to go to your wifi settings; either way go to your wifi settings and find the entry that says “Amazon-(something)”. This is your Echo Dot. Click on it to connect to it.

Upon connecting to your Echo Dot, you should be returned to the Alexa app, otherwise just go back to it. You should now be prompted, within the Alexa app, to select your actual wifi network.

From there you just need to wait while it finishes setting up your Echo Dot. You will likely see these screens:

And that’s it!
A few things to note:
– We have found that sometimes you may need to go through this a couple of times. If you do, you may need to first factory reset your first generation Dot; to do this use a paperclip to push into the reset hole on the bottom of your Dot.
– For some reason our 1st-gen Echo Dot always shows as ‘offline’, but it works just fine.
– The option to assign a new wake word never works; the 1st-gen Echo Dot will be listening for “Alexa”. At least that’s the case here.
The Internet Patrol is completely free, and reader-supported. Your tips via CashApp, Venmo, or Paypal are appreciated! Receipts will come from ISIPP.
CashApp us
Venmo us
Paypal us